Tuesday, March 11, 2014

Awareness Ribbon Water Bottle Cozy

MS Awareness Water Bottle Cozy
MS (multiple sclerosis) is not new, but the battle is new for some. My friends daughter was recently diagnosed at 22. I have several very good friends who have been battling it for years. It is heartbreaking to watch someone you love suffer and not be able to do anything about it! As a way to help my friend raise funds for her daughter's first MS walk since she was diagnosed, I made up this Water Bottle Cozy pattern. The cozies will be used as part of an auction.
There are so many causes out there, this pattern can be used for any of them by changing up the colors of the ribbon.  The base is simple, and really, you could use any appliqué pattern on it. Enjoy!

Wikepedia has a list of what colors are used for what cause. Ribbon Color Chart

Awareness Ribbon Water Bottle Cozy

Two colors of cotton yarn.
I used Sugar'n Cream. It takes about an ounce of the main color and less than 1/2 an ounce for the ribbon color.

Hook Size: J hook

Chain 2
Row 1: 8 hdc in 2nd chain from hook. Join with slip stitch, chain 1.
Row 2: 2 hdc in each space around. Join with slip stitch, chain 1.
Row 3: 1 hdc in first space, 2 hdc in next. Repeat around. Join with slip stitch, chain 1.
Row 4: 1 hdc in back 2 loops only around. Do not join.
Row 5-20: Work these rows in the round. 1 hdc in each space around.
On last stitch of row 20, join with a slip stitch bringing in color B.
Row 21: chain 1, sc in each space around. Join and tie in ends.

Awareness Ribbon

Chain 30
Row 1: sc in the loop on the back side of the chain across. Chain 1 and turn.
Row 2: sc in each stitch across. Tie off the end leaving enough yarn to sew ribbon onto the cozy.

Place the ribbon folded over where you want it on the cozy. Stitch around to secure it in place. Tie in ends.

( I placed the cozy on the bottle and sewed the ribbon on. Seemed to keep it better placed that way.)

Wednesday, February 5, 2014

Neon Fiesta - Reflective Toddler Beanie

This week I celebrated my 20th wedding anniversary. While out on a weekend excursion, dear hubby displayed one of the many reasons we are still married...he loves me to the moon and back...or in this case to Hobby Lobby and back! Since we don't have a store in our area, he stopped at one we found while we were out. Let me tell you, a man who is willing to happily yarn shop with you is definitely a man worth keeping around for 20 years!
I had heard Hobby Lobby carried their own brand of Reflective yarn and I was anxious to give it a try. Paired with the neon yarn, I made Neon Fiesta. A fun toddler hat that's reflective too. Unlike the Red Heart Reflective that's a 5 bulky weight, I Love This Yarn Reflective is a 4. It made for a lighter weight hat as well. I actually kind of love this yarn. It was not splitty at all, and minus the unavoidable scratchiness of the reflective strand, it was quite soft.
 

Neon Fiesta (Reflective Toddler Hat)

Materials:
I Love This Yarn
1 Skein Neons - Bright Neon
1 Skein Reflective - Yellow Glow
(Each skein will make three hats.)

I hook
Tapestry needle for working in ends

Gauge:
6 DC = 2 in.
5 rows = 2 in.

DC - Double Crochet
SC - Single Crochet
Join - (Join the end of each round by slip stitching into the top of the first Double Crochet

Start with Magic Ring, Chain 2
Row 1:  8 DC in Magic Ring, join. Chain 2
Row 2: 2 DC in each stitch and join. Chain 2.
Row 3: 2 DC in first stitch 1 DC in next stitch, Repeat until you have come back around and join at the top of your first DC. Chain 2.
Row 4:  2 DC in first stitch 1 DC in next 2 stitches, Repeat until you have come back around and join at the top of your first DC. Chain 2.
Row 5:  2 DC in first stitch 1 DC in next 3 stitches, Repeat until you have come back around and join at the top of your first DC. Chain 2.
Row 6:  2 DC in first stitch 1 DC in next 4 stitches, Repeat until you have come back around and join at the top of your first DC. Chain 2.
Row 7:  2 DC in first stitch 1 DC in next 5 stitches, Repeat until you have come back around and join at the top of your first DC. Chain 2.
Row 8- 12: DC in each stitch around, joining and chaining 2 after each round.
Row 13: DC in each stitch around, join and bring in yellow glow yarn. Chain 2
Row 14: DC  in each stitch around, join and chain two.
Row 15: HDC in first stitch, FPDC in next. Continue this pattern around. Join and chain two.
Row 16: Repeat row 15. Make sure the FPDC and the HDC line up with each other. Join and chain one.
Row 17: SC in each space around. Tie off and weave in ends.


Make a Pom Pom out of the Yellow Glow and tie it onto the top through the stitches of the Magic Ring.

Thursday, January 16, 2014

Starry Night Reflective Beanie

Red Heart has come out with an exciting new yarn called Reflective.  Right now, it is pretty hard to come by.  I happened to be in the right place at the right time and managed to get ahold of some. For the most part, I am loving it. It is a bulky weight yarn. (5) I love the way the weight of it feels. So, maybe that doesn't make total sense, but it has a comfortable heaviness to it. The reflective thread, woven into the skein, creates an amazing effect when it's hit with light. (You can see it in the picture when the hat is photographed with a flash.)
While I am generally thrilled with this yarn, a few thing warrant a mention. I would not recommend this yarn for small children, or hats for bald people, unless you plan on lining your project. The reflective strand is just a bit scratchy. Secondly, the skeins I have worked with so far, about six of them, have been very difficult to pull from the center. I have had to pull quite a chunk from the center to find the start. One skein in particular was so difficult to get to I ended up unwinding the entire skein to get it untangled. Lastly, and probably most discouraging, is that I have found at least one section of yarn on each skein where there was a knot attaching the yarn together, and a few spots the yarn was a bit "puffy" ar freyed looking. I have been fortunate so far that it has worked into the back of my project. However, I have heard nothing but good about Red Heart's customer service and feel if I contact them with concerns they'll make it right.
The pros far out weigh the cons as far as I am concerned. I will keep purchasing and keep using it!

Starry Night Beanie


Materials:
Red Heart Reflective
1 Skein Black
1/2 Skein Grey
J hook
Tapestry needle for working in ends

Gauge:
6 DC = 2 in.
4 rows = 2 in.

DC - Double Crochet
SC - Single Crochet
Join - (Join the end of each round by slip stitching into the top of the first Double Crochet

Work rows as follows: Start with black for first three rows. Switch to grey on Row 4 and Row 5, back to black for four rows and back to grey for Row 10 and Row 11, then back to black for the remainder of the hat.

Start with Magic Ring, Chain 2
Row 1:  9 DC in Magic Ring, join. Chain 2
Row 2: 2 DC in each stitch and join. Chain 2.
Row 3: 2 DC in first stitch 1 DC in next stitch, Repeat until you have come back around and join at the top of your first DC. Chain 2.
Row 4:  2 DC in first stitch 1 DC in next 2 stitches, Repeat until you have come back around and join at the top of your first DC. Chain 2.
Row 5:  2 DC in first stitch 1 DC in next 3 stitches, Repeat until you have come back around and join at the top of your first DC. Chain 2.
Row 6:  2 DC in first stitch 1 DC in next 4 stitches, Repeat until you have come back around and join at the top of your first DC. Chain 2.
Row 7:  2 DC in first stitch 1 DC in next 8 stitches, Repeat until you have come back around and join at the top of your first DC. Chain 2.
Row 8- 15: DC in each stitch around, joining and chaining 2 after each round.
Row 16: SC in each stitch around, join and tie off.

Use a tapestry needle to weave end threads into the hat.

For a slouchier hat, The length of this hat can be adjusted by adding additional rows before you add the row of SC.

Wednesday, January 15, 2014

USA Peak - My Mountain Series

Along with some other fantabulous designs, another of my hat patterns has been released in the My Mountain Hat Series. USA Peak is a fun hat that is easy to work up and a great way to support Team USA in the Olympics. What's even better, you can get it for free! Plus, there are some other really cool hats! Check out USA Peak and the other great, free patterns at My Mountain.

Monday, November 25, 2013

Striped Elf Hat Pattern

I made this hat for my son to wear to "Hat Day" at school. I was asked about the pattern, and since I didn't follow a pattern I said I would write up what I did. So here it is. Please share with me if you use the pattern. I would love to see how it turns out! On the down side, as this hat is hot off the hook today, so is the pattern. It hasn't been tested yet. If you find something that doesn't quite make sense, or any other issue, feel free to contact me!  This size is large enough to fit a female adult, but fits loosely but not too loose on my 10 year old.
Happy Crocheting!
Sheri

Striped Elf Hat
By Sheri Goad
(Edited to Add: The fur around the brim is created by using a combined strand of Red Heart White and Bernat Boa in white. I have also changed the last line. I used 3 rows of the white for the brim. I had only put down two. It now reads Row 64-66.)


Materials
Less than half skein of each:
Red Heart Super Saver:
Cherry Red, Glowworm, White
(Any Worsted Weight in your choice
of colors will work for this pattern.)
Bernat Boa: White
Hook Size: I
Tapestry Needle


Gauge
4 rows = 2” 6 stitches = 2”


Row 1: Magic Ring, Ch 2, 9 DC Join (9)
Row 2: 1 DC in each stitch around. Join. Ch 2.
Row 3: 1 DC in each stitch around. Join with Red, Ch 2 .

Row 4: 1 DC in each stitch around. Join. Ch 2.
Row 5: 1 DC in each stitch around. Join with Green, Ch 2 .

Row 6: 1 DC in each stitch around. Join. Ch 2.
Row 7: 1 DC in each stitch around. Join with Red, Ch 2 .

Row 8: 1 DC in each stitch around. Join. Ch 2.
Row 9: 1 DC in each stitch around. Join with Green, Ch 2 .

Row 10: 2 DC in first stitch, 1 DC in next two stitches. Repeat around. Join. Ch 2. (12
Row 11: 1 DC in each stitch around. Join with Red, Ch 2 .

Row 12: 1 DC in each stitch around. Join. Ch 2.
Row 13: 1 DC in each stitch around. Join with Green, Ch 2 .

Row 14: 1 DC in each stitch around. Join. Ch 2.
Row 15: 1 DC in each stitch around. Join with Red, Ch 2 .

Row 16: 1 DC in each stitch around. Join. Ch 2.
Row 17: 1 DC in each stitch around. Join with Green, Ch 2 .

Row 18: 2 DC in first stitch, 1 DC in next two stitches. Repeat around. Join. Ch 2. (16)
Row 19: 1 DC in each stitch around. Join with Red, Ch 2 .

Row 20: 1 DC in each stitch around. Join. Ch 2.
Row 21: 1 DC in each stitch around. Join with Green, Ch 2 .

Row 22: 1 DC in each stitch around. Join. Ch 2.
Row 23: 1 DC in each stitch around. Join with Red, Ch 2 .

Row 24: 1 DC in each stitch around. Join. Ch 2.
Row 25: 1 DC in each stitch around. Join with Green, Ch 2 .

Row 26: 2 DC in first stitch, 1 DC in next two  three stitches. Repeat around. Join. Ch 2. (20)
Row 27: 1 DC in each stitch around. Join with Red, Ch 2 .

Row 28: 1 DC in each stitch around. Join. Ch 2.
Row 29: 1 DC in each stitch around. Join with Green, Ch 2 .

Row 30: 1 DC in each stitch around. Join. Ch 2.
Row 31: 1 DC in each stitch around. Join with Red, Ch 2 .

Row 32: 1 DC in each stitch around. Join. Ch 2.
Row 33: 1 DC in each stitch around. Join with Green, Ch 2 .

Row 34: 2 DC in first stitch, 1 DC in next four stitches. Repeat around. Join. Ch 2. (24)
Row 35: 1 DC in each stitch around. Join with Red, Ch 2 .

Row 36: 1 DC in each stitch around. Join. Ch 2.
Row 37: 1 DC in each stitch around. Join with Green, Ch 2 .

Row 38: 1 DC in each stitch around. Join. Ch 2.
Row 39: 1 DC in each stitch around. Join with Red, Ch 2 .

Row 40: 1 DC in each stitch around. Join. Ch 2.
Row 41: 1 DC in each stitch around. Join with Green, Ch 2 .

Row 42: 2 DC in first stitch, 1 DC in next five stitches. Repeat around. Join. Ch 2. (28)
Row 43: 1 DC in each stitch around. Join with Red, Ch 2 .

Row 44: 1 DC in each stitch around. Join. Ch 2.
Row 45: 1 DC in each stitch around. Join with Green, Ch 2 .

Row 46: 1 DC in each stitch around. Join. Ch 2.
Row 47: 1 DC in each stitch around. Join with Red, Ch 2 .

Row 48: 1 DC in each stitch around. Join. Ch 2.
Row 49: 1 DC in each stitch around. Join with Green, Ch 2 .

Row 50: 2 DC in first stitch, 1 DC in next four stitches. Repeat around. Join. Ch 2.
Row 51: 1 DC in each stitch around. Join with Red, Ch 2 .

Row 52: 2 DC in first stitch, 1 DC in next four stitches. Repeat around. Join. Ch 2.
Row 53: 1 DC in each stitch around. Join with Green, Ch 2 .

Row 54: 2 DC in first stitch, 1 DC in next four stitches. Repeat around. Join. Ch 2.
Row 55: 1 DC in each stitch around. Join with Red, Ch 2 .

Row 56: 2 DC in first stitch, 1 DC in next four stitches. Repeat around. Join. Ch 2.
Row 57: 1 DC in each stitch around. Join with Green, Ch 2.

Row 58: 1 DC each stitch. Join. Ch 2.
Row 59: 1 DC in each stitch around. Join with Red, Ch 2 .

Row 60: 1 DC each stitch. Join. Ch 2.
Row 61: 1 DC in each stitch around. Join with Green, Ch 2 .

Row 62: 1 DC each stitch. Join. Ch 2.
Row 63: 1 DC in each stitch around. Join with White and White Boa together. Ch 2 .

Row 64-66 1 DC in each stitch around. Join. Tie off after last round and weave in ends.

Make a Pom-Pom using the White and White Boa yarn. Attach to the end of the hat.


©2013 Frogging Along/ Sheri Goad This pattern may not be sold or duplicated. You may sell the items you make from this pattern. Online, please link back to the pattern. Thank You!

Wednesday, November 6, 2013

Craft Shows and Orders and Gifts! Oh, My!

Tis the season. Hard to believe I have not posted since October 2nd! Fall has arrived, and so has the busy. October was full of hustle and bustle and my hook got so busy my hand decided to protest. Here is a peek at some of what I've been doing...

A dear friend of mine has been battling cancer, I flew out to Illinois to visit with her and attend a benefit auction. While there I made her a horse hat per her request along with a few other crochet items that went into a raffle. I didn't use a pattern for this, but there are some great patterns out there!

For Breast Cancer Awareness month, I put together this hat and wristers set using Deborah Norville Collection Serenity Baby Yarn in Tea Roses. I used a basic beanie pattern for the hat, a row of double crochet for the ribbon, and Red Heart's pattern for the wristers. Pattern Here (Free Pattern)

What does the fox say??  If you have not seen this video yet, take a moment and watch. (You will either love it or hate it.)


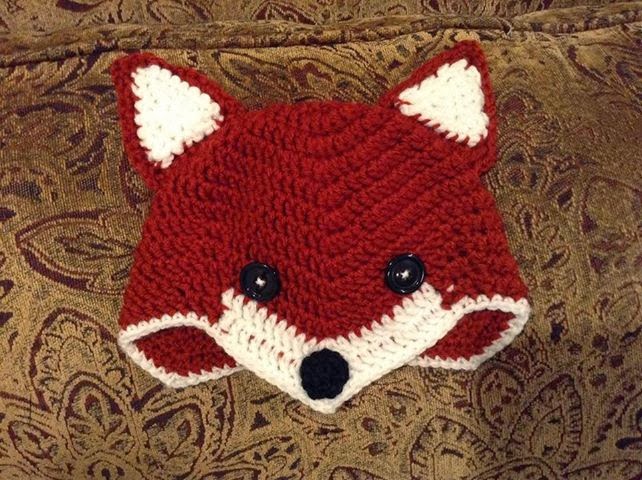
I'm in the love camp on this one, and had to try this Sly Fox Hat Pattern by Lisa Gutierrez (Free Pattern) It was a hit and was one of the first hats to go at the craft show I did last weekend!


So I did my first craft show last weekend. All things considered it went quite well. I have one more on the 16th and one in December. It is going to be a busy few months. One of the favorites was this scarf. Though I didn't use a pattern for it, there is a very similar pattern on Ravelry by Christy Fisher (Paid Pattern)

I have also been playing with itty bitty stuff! My son's teacher had a new baby and he wanted to give her an owl hat. I used the owl hat pattern from Repeat Crafter Me (Free Pattern) with just a few minor changes, the diaper cover is by Boomer Beanies'(Paid Pattern).
And this set for a friend who's granddaughter was born 7 weeks early. There isn't a pattern for the hat, but the booties are from Deb's Crafts (Free Pattern) I would have never thought to make the booties with an open heel so they can wear them even if the wires are attached to their little feet.

There is so much more I would like to share with you, but I have craft shows to prepare for, orders to fill, and gifts to be made! The holidays are quickly approaching and there is way to much cool stuff out there I want to try.  I leave you with this...my little Crochet Protege'...Elsa is one of my daycare babies and she loves to pretend to crochet!
Happy Crocheting!!

Wednesday, October 2, 2013

Pattern Testing: Is it for You?

This week I came across a designer who was looking for pattern testers. It just happened I scrolled past the request at just the right time. The first three to post with an email address would be sent the pattern to test. Several responded to the post, but only two others had left emails, so I quickly added mine and was excited to get the email from Kara Gunza, Petals to Picots, with the test pattern for this adorable Teether Lovey. Here's my test project.
Edited to add: Pattern Now Available

Have you ever thought about testing patterns? You will need to understand how to read a pattern and be willing to give feedback. Reliability and communication are musts. I spoke with both Kara Gunza from Petals to Picots and Sonya Blackstone from Beautiful Ducklings about what designers expect from testers.

What do you look for in pattern testers?

Kara: Mostly dependability and someone who can clearly communicate any errors or problems.

Sonya: Someone with experience reading patterns, that is reliable and can meet the deadline. The testers definitely need to be able count stitches so they can tell me if my count is off.

Do you have a group of testers you use regularly, or do you post as needed?

Kara: I do not. I usually put a post on Facebook and choose the testers on a "first come, first chosen" basis. 

Sonya: I post as needed, gives everyone a chance to offer, although I have had a few bad apples, so I have considered just doing a group

What would make you use a tester more than once?

Kara: Sometimes I will ask a tester to test if I think they would have a particular interest in a pattern I am working on. For instance, if I remember someone recently had a new baby and I have a baby item to test, I might ask them first.

Sonya: I would use a tester more than once if they were reliable! Easy to communicate with!

What would make you never use a tester again?

Kara: I would never use a tester again if they were unreliable. I do understand that sometimes life gets in the way of deadlines, but if they don't communicate with me about the delay, then I probably wouldn't use them again.

Sonya: I have a few testers I would never use again because they received my pattern and then the next day they would message me with some thing like "Oh sorry my kids are sick" "something came up" or they would test halfway and get bored with the project and quit and just stop communicating.

Any advice you would give someone who is testing out a pattern for you or any other designer?

Kara: Just be yourself ... trust your skills and instincts. And keep the designer in the loop with any problems.

Sonya: Don't sign up to test if you can't actually get it done! Most patterns only take a couple of hours in total to complete...most testers give 48 hours..that's plenty of time to sneak in time to complete it! Don't offer if you're not 100% sure that you can get it done and provide feedback! BE RELIABLE!! COMMUNICATE!


Testing patterns can be fun, and can benefit both the designer and you. Before you sign up, be sure you will have the time to follow through, the supplies needed, and the skills for the pattern level. And most importantly, remember the designer is trusting you with their design. You should never publish or share the pattern or details of the pattern. 

Happy Testing!

Total Pageviews